Three useful camera settings methods
Three useful camera settings methods
Many novices never or rarely look at their setting menu of camera, camera factory default project actually is not always the best, sometimes you also need adjustment according to different environment to get a beautiful result without later processing! There are three secrets you may not know the camera Settings, you'll find they are very useful! Because different brand camera setting is different, temporary we only list these three brands: Canon, Nikon, Sony,
(1) colour set
Nikon: Picture Control
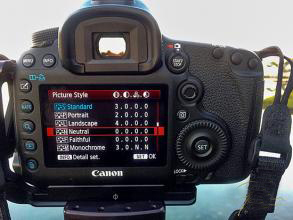
Canon: the Picture Style
Sony: Creative Style
"Color setting this option is very important, especially for invoices who do not do post processing and only shoot JPG file, For example, if you want picture color a bit stronger, you can set it from here! Once I buy a camera, I will try to shoot a few pictures for blue, red items etc, to understand the types of colour deviation and then in the "color Settings" option inside adjustment (usually the camera will also have a variety of preset patterns to choose from), because I take many scenery, so in saturation, contrast and resolution, etc. Also need to increase a little, to photograph more colorful picture! But be careful when you when shooting portraits, you can set your color back a "portrait", otherwise the opportunity to increase the degree of saturation, will make the skill yellow, which is not beautiful enough. Be careful that set option here would be to use on your JPG photos, but not necessarily in the RAW file, so it's best to test in advance!
(2) Automatic balance light is poor
Nikon: Active D - Lighting
Canon: Auto Lighting Optimizer (ALO)
Sony: droz/HDR
In some of the big difference light environment, for example, take the sky and the ground, or some strong illuminant, turn on this setting and the camera will replace the light bit and raise the dark bit for you, make photos look more balance. With colour is set to the same reason, the tool will affect the JPG photos, but not necessarily to be applied to the RAW file.
In everyday shooting, I most will open this option, but if is silhouette photos then it's best to shut it off, because it can enhance brightness, the silhouette parts destroyed the original intention; And if you find it strange color, such as the edges of the sun, sunrise sunset may also be the set, then you can close it and try again.
It's worth noting that Sony has two choices, one is DRO, the other is a HDR, the former will only take a photo to fine-tune the light from the darkness; The latter will be continuous shooting photos and assembled into one, in theory, the latter (HDR) of the effect will be better, but because shooting many photo is not suitable for using on the moving objects.

Finally, mentioning you in the camera function of the automatic balance light effect is limited and cannot manual fine tuning, therefore it is strongly recommended that the novice spend a little time to learn to use GND gradual change filter tips and Photoshop RAW file post processing skills, which will achieve better effect, and is easy! We also have a lot of relevant teaching, don't miss!
(3) save RAW + JPG at the same time
Although this option may not be any "secrets", but it is also useful! Sometimes I travel a lot of photos, but at the same time I also is very lazy don't want to do post processing, but at the same time there are some photos and it is necessary to use RAW file, so this option RAW + JPG can simultaneously satisfy these two wishes! After the shooting can be directly send JPG to upload to Facebook or to a friend, also can keep RAW file for system for later use. Which is very convenient! This option has two disadvantages, one is the demand for large capacity memory Card, but now the SD Card is very cheap, buy a few more copies can solve this problem; Another is will lead to slow to write, it will influence the number of continuous shooting, which requests write faster memory card!
Your camera might actually hides a lot of useful function and you don't know! Remember to after buying a camera, don't rush to take pictures, the first on the Internet or the method of use or read the instructions before beginning, so you will have a deeper knowledge of their own equipment, also will be more comfortable when you take a photo!
Recent Posts
-
What is rolled canvas prints
In the realm of interior decor and artistic expression, canvas prints have emerged as a popular medi …10th Apr 2024 -
The benefits of printing family photos on canvas
In an age dominated by digital screens and fleeting images, the value of printed photographs cannot …7th Apr 2024 -
The best ways to use canvas prints for home decor
In recent years, canvas prints have emerged as a popular choice for home decor, adding style, person …3rd Apr 2024